


How Silver Foil is Applied to Your Custom Boxes
This guide will take you on a journey to understand the fascinating and precise process behind creating these dazzling custom silver foil boxes.
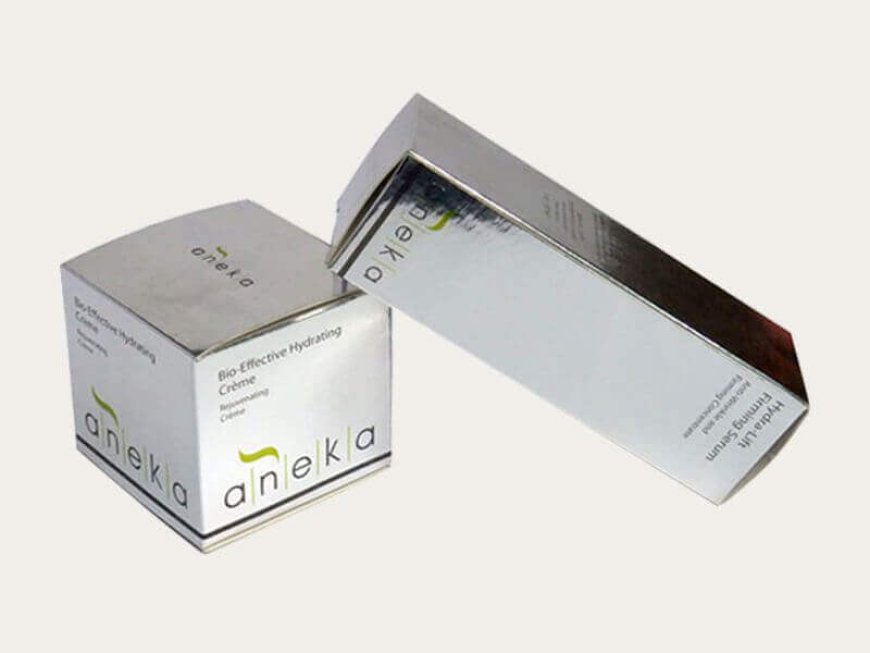
Have you ever picked up a product and been immediately drawn to its packaging? Often, that special sparkle comes from silver foil. Its more than just a shiny print; its a detailed process that makes products stand out and look truly luxurious. Silver foil packaging adds a touch of class that ordinary printing just can't match. Imagine a beautiful cosmetic box or a fancy chocolate package the silver shine makes it feel extra special, right? This metallic shimmer catches the eye, creating a premium feel that speaks volumes about the product inside. It instantly communicates quality, sophistication, and a keen eye for detail. This eye-catching finish sets a product apart on crowded store shelves, making it almost impossible to ignore.
What exactly is silver foil in packaging? Its not simply a silver-colored ink that's sprayed or printed on. Instead, its a very thin, real metallic layer that is carefully applied to the packaging material. This method gives a completely different look and feel compared to regular ink. It has a distinct shine and a smooth, sometimes even slightly raised, texture that adds to the high-end experience. Brands choose this special embellishment for many reasons. They want their products to be memorable and unique, setting them apart from competitors. Silver foil helps create a strong, premium image, making customers feel like they're getting something truly valuable. In short, silver foil packaging acts as a powerful visual cue for quality and exclusivity, drawing customers in and making them curious about the product. This guide will take you on a journey to understand the fascinating and precise process behind creating these dazzling custom silver foil boxes. Youll see how a simple box transforms into a work of art that grabs attention and boosts brand appeal.
Deciphering the Difference: Hot vs. Cold Foil Stamping
When it comes to putting that beautiful silver shine on your boxes, there are two main ways it can be done: hot foil stamping and cold foil application. Both methods achieve a fantastic metallic look, but they work quite differently and are used for different types of projects. Understanding these methods helps you appreciate the skill and technology involved in making your custom silver foil boxes look perfect. Each process has its own advantages, depending on the desired outcome, the material being used, and the quantity of boxes needed.
A. The Precision of Hot Foil Stamping: Hot foil stamping is the older, more traditional way to apply foil, and its known for creating very sharp and clear metallic finishes. Think of it like a specialized stamp, but instead of ink, it uses heat and pressure to transfer the foil. First, a custom metal "die" (which is like a metal stamp with your design on it) is heated up. Then, a roll of silver foil is placed between this heated die and the packaging material. When the hot die presses down, the heat activates a special glue on the foil. This glue makes the silver stick only to the parts of the box where the die touches it. This process gives a very crisp, solid silver look. The main advantages of hot foil stamping are its sharp definition, meaning the edges of your design are very clean, and its high opacity, so the silver color is really bright and stands out. It also often leaves a slight impression, either pressed in (debossed) or slightly raised, which adds a nice tactile feel. This method is often chosen for creating truly premium silver foil boxes with intricate details, logos, or text that need to look exceptionally sharp and feel luxurious to the touch.
B. The Flexibility of Cold Foil Application: Cold foil application is a newer and often faster way to add metallic effects. Unlike hot stamping, it doesn't use heat or special metal dies. Instead, it uses a sticky, liquid glue that cures (or hardens) with UV light. Heres how it works: first, a special UV-curable glue is printed onto the packaging material in the exact shape of your silver design. Then, the silver foil is pressed onto this sticky glue. The whole thing then passes under a UV lamp, which quickly hardens the glue and bonds the silver foil to the box. Any extra foil that didn't stick is then removed, leaving only your shiny design. The big advantages of cold foil are its speed, which makes it very cost-effective for large production runs, and its flexibility. You can also print other colors directly on top of cold foil, creating cool holographic or multi-colored metallic effects. However, for extremely tiny details or very fine lines, cold foil might not be as sharp as hot stamping. So, while it's great for big jobs and colorful effects, hot stamping is often preferred for those super precise details on custom silver foil boxes where absolute sharpness is key.
The Art and Science of the Stamping Die
At the very core of creating stunning silver foil effects, especially with the hot stamping method, is something called a "die." Think of the die as the master blueprint or a special metal stamp for your design. It's a precisely made metal plate that holds the exact image, text, or pattern that will be transferred onto your packaging. This custom tool is what ensures the silver foil goes exactly where it's supposed to, making it a truly critical piece in achieving that perfect, eye-catching look for your custom silver foil boxes. Without a well-made die, even the best foil material won't look right.
There are different kinds of dies, each serving a specific purpose. The most common type is the flat die. These are used to create designs that are flat and two-dimensional, like a shiny logo or a line of silver text. They are usually made from strong metals like brass or magnesium. The process involves either photo-engraving, where light and chemicals are used to etch the design, or CNC milling, which uses computer-controlled machines to carve the design with extreme accuracy. Its super important that these dies have very sharp edges. This ensures that when the die presses down, the silver foil transfers cleanly and perfectly, without any blurry or uneven lines.
For even more impressive effects, there are sculpted or multi-level dies. These are more complex because they have different depths, meaning parts of the design are raised higher or lower. When these dies are used with silver foil, they can create designs that are not only shiny but also have a 3D texture, either raised (embossed) or pressed in (debossed). This adds another layer of luxury and encourages people to touch the packaging. Before any die is made, its journey starts with a precise digital design file. This file must be in a "vector graphic" format (like files from Adobe Illustrator). Vector graphics are important because they can be scaled to any size without losing quality or becoming blurry. This precision in the digital design is crucial for making sure the silver foil is applied with sharp, clean lines in the final product. Ultimately, the quality and accuracy of this stamping die directly control how crisp, clear, and beautiful the silver foil looks on your final packaging. A well-crafted die is simply essential for getting consistent, top-notch results that truly make your custom silver foil boxes shine.
The Intricate Layers of Foiling Material
When you see that striking silver shine on a box, you might just think its a simple metallic sheet. But in reality, the silver foil itself is a surprisingly complex material, made up of several intricate layers, each playing a crucial role in the transfer process. Understanding this layered structure is key to truly appreciating the quality and durability of well-made custom silver foil boxes. Its a sophisticated material, carefully engineered to ensure perfect transfer and a brilliant finish.
Let's break down what makes up a typical roll of silver foil:
-
Carrier Film: This is the base layer, a transparent and strong polyester film. Think of it as the temporary backing that holds all the other layers together during the manufacturing and application process. Its built to withstand the heat and pressure of the stamping machine and is peeled away and discarded once the silver foil has been transferred to the box.
-
Release Layer: Right on top of the carrier film is a very thin, wax-like layer. Its job is simple but critical: it allows all the other layers of the foil to cleanly separate and transfer from the carrier film onto the packaging material during the stamping process. A consistent and effective release layer ensures a smooth and complete transfer, preventing patchy or incomplete foiling.
-
Lacquer Layer: This layer is a protective coating that also provides the specific color or finish of the foil in your case, a shiny or matte silver. It acts as a protective barrier and also ensures that the metallic layer adheres well to the packaging. This is the layer that gives the foil its overall tint and plays a big part in its final appearance on your custom silver foil boxes.
-
Metallic Layer: This is the star of the show an incredibly thin, almost microscopic, layer of actual aluminum. This metallic layer is applied through a process called vacuum metallization, where aluminum vapor is deposited onto the lacquer layer. This ultra-thin metallic film is what provides that signature, highly reflective silver sheen. Despite its thinness, it has a powerful impact, making your custom silver foil boxes instantly recognizable and distinctive.
-
Adhesive Layer: The final layer, on the very bottom of the foil roll, is the adhesive. This is the glue that makes everything stick. In hot stamping, this layer is activated by heat and pressure, causing it to bond firmly to the packaging material. In cold foiling, it's a UV-curable adhesive that hardens when exposed to ultraviolet light. The chemical make-up of this adhesive is vital for ensuring a strong, long-lasting bond, ensuring the silver foil stays put and looks beautiful for the life of your packaging.
The flawless adhesion and stunning appearance of the silver foil on your custom boxes are a direct result of how these intricate layers work together. With precise heat, pressure, and the right adhesive, the silver foil transfers permanently and beautifully, creating a durable and eye-catching finish that enhances the overall quality of your packaging.
Combining Shine with Texture: Foiling and Embellishments
The magic of silver foil doesn't stop at just adding a shiny flat design to your boxes. The real artistry often comes from combining silver foil with other special finishing techniques. These combinations create textures and depths that make your custom silver foil boxes not just visually appealing, but also delightful to touch. This multi-sensory experience truly elevates the packaging, making it memorable and luxurious. When you combine shine with texture, you're not just packaging a product; you're creating an experience that captivates consumers from the moment they lay eyes on it.
A. Embossing with Silver Foil: Embossing is a technique that literally raises parts of the paper or cardstock, making the design stand out in a three-dimensional way. Imagine touching a logo on a box, and you can feel it slightly popped up. When silver foil is applied to an embossed area, the metallic design is not only shiny but also given a raised, prominent form. This creates a powerful focal point on the box, drawing the eye and inviting customers to reach out and feel the texture. An embossed silver logo, for example, conveys a strong sense of quality and craftsmanship. This technique is often reserved for truly high-end silver foil packaging, where the goal is to create a sophisticated, tactile experience that screams luxury and exclusivity. Its perfect for brands that want to make a lasting impression and emphasize the premium nature of their products.
B. Debossing with Silver Foil: Debossing is the opposite of embossing; instead of raising the design, it presses it down into the material, creating an indented impression. When silver foil is applied to a debossed area, it results in a subtle yet elegant metallic depression. This creates a refined contrast with the surrounding flat surface of the box. Debossed silver foil can provide a more understated luxurious feel, often used for delicate details, patterns, or borders where a quiet elegance is preferred over bold prominence. Its a technique that speaks to a refined taste, offering a sophisticated touch that might not immediately jump out but leaves a lasting impression of quality and meticulous design. It's a testament to the versatility of custom silver foil boxes.
C. Spot UV and Other Varnishes: To further enhance the visual impact of silver foil, clear varnishes like Spot UV are often used. Spot UV is a clear, glossy coating applied to specific areas of the packaging. When placed over or next to silver foil, it creates varying levels of shine and contrast. For example, a matte finish box with a glossy Spot UV over a silver foiled logo makes the logo pop even more intensely. This adds another layer of visual complexity and sophistication, highlighting the metallic elements and making them appear even more vibrant. Other varnishes, like soft-touch coatings, can also be combined to create interesting tactile experiences that complement the metallic shine. These complementary effects ensure that your custom silver foil boxes are not just visually appealing but also offer a delightful sensory interaction for the consumer, making your packaging truly stand out.
Designing for Dazzle: Best Practices for Silver Foil Artwork
Achieving truly stunning custom silver foil boxes is an art form that begins long before any foil is actually applied. The journey to a dazzling finish starts with careful and precise artwork preparation. This initial design phase is absolutely critical to ensure that the silver foil is applied flawlessly, looks spectacular, and creates the exact visual impact you envision. Without proper artwork, even the most advanced foiling machinery can't guarantee a perfect result. Its about setting the stage for brilliance.
Here are some key design considerations and best practices to keep in mind when preparing artwork for silver foil:
-
Vector Graphics are a Must: This is perhaps the most important rule. For all elements that will be foiled whether it's a logo, text, or a pattern you absolutely must use vector-based files. Common vector formats include AI (Adobe Illustrator), EPS, or SVG. Why is this so crucial? Unlike raster images (like JPEGs or PNGs, which are made of tiny pixels), vector graphics are created using mathematical paths. This means they can be scaled to any size, from a small emblem to a large design, without losing any quality or becoming blurry or pixelated. If you try to foil a raster image, the metallic effect will appear jagged and unprofessional, completely ruining the premium look you're trying to achieve with your custom silver foil boxes.
-
Creating a "Foil Layer": In your design software, you'll need to set up a separate layer specifically for the silver foil elements. This is often done by assigning a "spot color" (a solid, pre-mixed color, rather than a mix of CMYK) that is clearly labeled as "Foil" or "Silver Foil." This special layer tells the printer exactly where the metallic foil needs to be applied, ensuring it's distinct from any regular inks or other design elements. It's like giving the printer a precise map for where the shine goes.
-
Mind the Details: While silver foil can be incredibly detailed, there are some practical limits. It's generally advised to avoid extremely fine lines or very tiny text when designing for foiling. These can be challenging to "register" (align perfectly) during the stamping process and might result in a less crisp or slightly messy finish. Similarly, while a bold statement is good, extremely large solid blocks of foil might sometimes show minor imperfections or "hot spots" depending on the material and press. Its about finding the balance between impact and precision to ensure your silver foil packaging looks flawless.
-
Contrast and Legibility: Consider how the silver foil will appear against the base material of your packaging. A matte background will make the shiny silver pop dramatically, while a glossy background might offer a more subtle, integrated shimmer. If you're foiling text, ensure it remains legible. The contrast between the foil and the surrounding material, as well as the font choice, plays a big role in readability. This meticulous attention to detail during the design phase ensures your silver foil packaging truly shines and effectively communicates your brand's message.
-
Iterative Design Process: Before full production, it's highly valuable to review digital mock-ups and physical proofs. These allow you to visualize exactly how the silver foil will appear on the final custom silver foil boxes. This step is crucial for making any necessary adjustments to the design, ensuring that the finished product perfectly matches your vision and high standards.
Partnering for Perfection: Choosing Your Custom Silver Foil Box Provider
The journey to creating truly impactful and memorable packaging, especially when it features the elegant touch of silver foil, is a complex one. It demands more than just a good idea; it requires a deep understanding of materials, intricate printing processes, and expert design. The precise steps involved in applying silver foil from crafting the perfect die to managing the intricate layers of the foil material itself demand not only expertise but also a meticulous attention to detail and a commitment to precision. This is where the right partner makes all the difference, ensuring your vision for custom silver foil boxes becomes a stunning reality.
Ultimately, well-executed custom gold foil boxes are far more than simple containers for your products. They are powerful tools that speak volumes about your brand. They communicate luxury, an unwavering attention to detail, and a profound commitment to delivering quality. Imagine a customer's delight as they open a box that glistens with a sophisticated silver sheen it transforms an ordinary unboxing into an unforgettable experience. This heightened experience strengthens brand loyalty, leaves a lasting impression, and significantly enhances the perceived value of your product. In today's competitive market, such a distinctive presentation can be the key to standing out and attracting the right customers.
When you're ready to elevate your product presentation and leave a lasting impression, its essential to choose a packaging provider that truly understands the nuances of metallic finishes. For businesses looking to achieve this level of sophistication and premium appeal, consider Affinity Custom Boxes. With their deep knowledge of the intricate foiling process, commitment to unparalleled quality, and an eye for design, they are equipped to bring your brand's vision for magnificent custom silver foil boxes to life. Explore the endless possibilities and discover how a dedicated partner can help your packaging truly shine, capturing the attention and imagination of your customers.